Friday, August 27, 2010

Day 23-26 Waterproofing, plumbing and backfill

With the skies cleared up, the guys really moved along this week. The masons are nearly done and the plumber was able to get started. We ran into a few hiccups with the DC inspector and with the rain that we have had, we are about a week behind. This is the stage that is the easiest to get sidetracked, and the issues were not due to anything that Hyo or we could resolve, so I am not concerned with the effect this will have overall.

Hyo has been great with keeping us informed and up to speed with where things stand. Erik also gets back tonight from a vacation to Lebanon, so we will be meeting with him this weekend to get him up to speed with what is going on and identify next steps.

Anyway, on to the pictures!

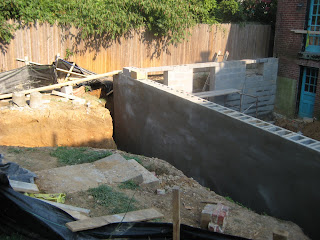
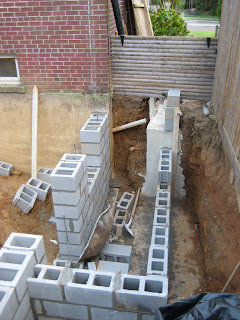
The masons finished the walls, capped them off with cement, waterproofed the outside, put up the drain tile and backfilled the walls. That allowed the plumber to come out and trench the drain lines for the basement bathroom, kitchen and washing machine.


Here you can see the finished walls and trenches for the plumbing. They will be filled up with gravel after the inspection and covered by the slab.

Here are the finished window openings and window well.

The huge pile of dirt from the dig has disappeared and filled in the space behind the walls.

Here you can see the backfill and the black sheet that is between the earth and foundation wall.

The small blocks are holding the padding away from the parging and sealcoat.

You can see here the drain lines for the basement bathroom.

The trench going out the door into the landing is for the drain line to the space outside the entry door.


A close up of the drain lines laid out.


A view back of the house. The size of the addition is starting to seem much larger.


Another view of the back wall. There is a black coating painted onto the parging and then a black plastic pad on top of that.


The yard is going to be level with the top of the plastic and slope slightly back to the garage.

Monday, August 23, 2010

Days 19 - 22 - Moving

So the reason that we haven't been updating the blog over the last few days is that we have been moving. We decided that the dust and noise of a renovation would be more than we could handle for 5-6 months, so we opted for relocating up the street to an apartment in Friendship Heights/Chevy Chase.
The move went exactly how you would expect - more expensive and three times longer than you wanted to deal with. So I guess we shot par on that one.

Well, once in to the new place, we set up camp pretty quickly. By Monday, we had pretty much moved everything that we wanted/needed and could start on the business of all of the rest of the things we put off for three days.

We are on the 11th floor with a pretty nice view of the surrounding area. We can see the top of the National Cathedral and the bell tower of the church just up the street form our house on Butterworth.


View of the kitchen. Nice cabinets and counters. The range is electric so it will take some getting used to (and I will miss my grill), but everything is newer and cleaner than what we left, so overall it is a big plus.


The master bedroom. We moved our small desk. You can't see it here because the blinds are drawn, but the entire corner of the bedroom near the desk is floor to ceiling glass. It is facing south so it gets pretty bright in the day, but the view is really nice.


Abby's room. Crib, changing table, bookshelf and more toys than you could imagine. It is a really good little playroom for her as well.


Living room. We brought over a couple of chairs form our former patio and set them out on our pretty good sized balcony along with some herbs and plants.


Of course, if there is a pool anywhere nearby, Abby wants to go, so we have been up every day since we moved in. It is two floors above us on the roof and is really nice. Good breeze, no mosquitoes, great view.


Daddy enjoys it as well. It beats moving the yard - that's for sure!


Hard to get much cuter than that.

Friday, August 20, 2010

Day 18 - Parge parge parge!

The rain has held off for a few days, so the crew is making a lot of headway. Today was parging (the cement based outer coat of the wall used to waterproof it) and filling the holes in the wall with cement. The crew set up a big mixer at the top of the ramp and set to work.


Cherry stump shot. Here you can see that they have completed the walls to the top and covered the entire back wall with the waterproofing. It is about a third to a half of an inch thick. This is what the existing house had as a basement wall as well. In fact, in this shot you can see the existing parging under the short windows of the existing basement. The stairwell went down to the left and was finished in brick, but the rest of the basement was block with this parge coat.


Another view across the back of the basement wall.


Where the wall was not in direct sunlight, the surface coat has taken longer to dry. I imagine that they will want this stuff to set on the wall exposed like this for a couple of days before back filling the hole. This is definitely not a step that you want to rush, so they should take as long as they need.


Near the bottom of the wall, you can see where the parge coat comes all the way down and angles out into the soil. Even though, I have no idea if it is true, that seems like the right way to do it. So good job! (I think)


A view of the awning window opening for the living room.


The exposed block will be in the stairwell. The thinking is that we will either coat this with the same stuff or paint it with cement block water proof paint. Brick would be nice but aside from the cost, we thought it would make the stairwell very dark, so a lighter earth tone is probably the best bet.


They also waterproofed the outside retaining wall of the stairwell. This would be the place where lesser masons might shortcut. Not so with Juan and his crew.


I really have no idea how this blog software chooses to rotate images. This is sideways, but was intended to show the dam that they constructed on the ramp down to the pit to keep the cement overflow from draining down into the pit.


The sun is shining today and that is really helping.


Inside view of the west wall.

Thursday, August 19, 2010

Day 17 - Walls nearly complete

So the rain stopped and Hyo and the guys pumped out the water so it was time to get back to it!

Juan and the crew brought in some scaffolding to get access to the upper parts of the walls which carried the side benefit of keeping them out of the mud. The soupy mess at the bottom of the pit still hasn't dried (and won't for several days) because of the ridiculously dense clay soil. I honestly don't think that it is absorbed at all, but needs to evaporate.

The delay did give me a chance to run out to Home Depot and pick up the remaining windows needed for the basement awning openings. Erik and I didn't luck upon any of the size we needed at the building auction for a price that was worth it, so we left those to be purchased later. For those keeping tabs, it ran about $200 for three windows.


North east corner. The small hole is for the awning window and the large hole is for the bedroom egress window.


North west corner. You can see the awning window and the opening for the door to the basement on the left.


Here is a better view of that space from out of the kitchen door.


North west corner again. Sorry for the lack of vantage points, but the yard is still incredibly soggy so it is difficult to get around back there.


I still can't get some of these photos to rotate. Anyway, here is the opening for the window in the basement bathroom. The window I found was deeper that the others, but that will be nice to let more light in over the toilet.


View from the cherry stump. The wall is very nearly up to the first level of the house.


Here is a view down west side of the house that shows the stairwell leading down tot eh basement. The walkway past this on the right side will be quite narrow. I am going to remove the high fence and put in something waist height to open up the area a bit more. We are also going to move the gate from its current location to near the back of the new addition.


Another view of the back wall. They have filled in the space where the bobcat could go completely now, so anything going in or out of the basement is going to have to go by hand from here on out.


Another view down into the pit. It doesn't look it, but it is still pretty soggy in there even though it hasn't rained for a day and a half.

Wednesday, August 18, 2010

Day 16 - MORE RAIN

Sorry for the lack of updates recently, we have been busy moving out of the Butterworth place and into our new digs (more on that later).

So day 16 started like several days before - with TONS of rain. This morning it rained well over two inches in about an hour and completely flooded the site.

The exposed level of bricks just above the surface is actually the second course. There was about a foot of standing water after it stopped raining.


The incredibly hard clay earth of our lot doesn't absorb water at all, so it just kept collecting more and more as the rain came down.


Here is a view of the window opening for the bedroom egress window. You can see that the water has come up pretty high on the inside of the wall, but what is harder to make out is that, because some earth fell near the ramp and plugged up that as a drain, the water is very nearly at the top of the opening on the outside of the wall.


Needless to say, the masons aren't getting any work done today.I called Hyo and informed him of the mess and that I was worried about the water rising to the level that would allow it to flow back into the house, and he said he would be out with the pumps again to drain it. True to his word, he came out and stopped the rise before any damage was done. Well, aside from losing a day to mother nature.

Tuesday, August 17, 2010

Day 15 - Walls!

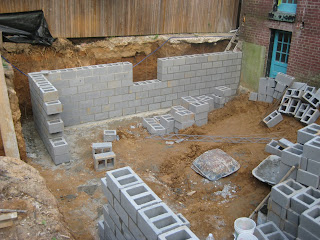
No rain today or last night, so there was a lot progress today! They started with the walls this morning and made a lot of headway. The huge piles of blocks started turning into real walls.


Here is the view from the cherry stump. After tomorrow I am going to put together a series of all of the photos I took from this spot.

Here you can see the area of the window well in the basement bedroom. It is the hole that is starting to develop in the wall. This will hold a large egress window required by DC building code (and most other parts of the country as well as I understand).

A lot of blocks still remain, but the pile is certainly getting smaller.

Here is a view down the ramp. they left a hole big enough to drive the bobcat through. I'm not sure of all of the different things that they still need that thing for, but it is a really useful thing to have around.

Here is a view of the window well that will be in the bedroom.

Sorry about the sideways photo. This free blogging software is far from perfect for images - for some reason they are not inclined to make it easy to store a lot of huge files on their free service.

This will be the stairwell up from the basement. There is a huge cement casing at the far end of the photo. I am not sure what that is for, but the more cement, the better - right?

A view down into the pit from the side. You can see the gap for the bobcat and the opening for the bedroom window.


Here is a view of that huge cement casing. I imagine it is there to ensure that the stairwell doesn't cave in - a problem that the old retaining wall suffered from, so I'm glad it is there.

Not too much room for doing the water proofing.

The wall ties into the existing foundation in a pretty simple way.